Day 19 Task: Docker for DevOps Engineers
Explore the following chapters of our Docker journey

- Docker Volume: Creating Storage Areas for Containers 🗄️🐳
🌐🔗
Task-1: Creating a Multi-Container Docker-Compose File 🚢👩💻
Using
docker-compose upanddocker-compose downfor container managementScaling with
docker-compose scaleand auto-scaling in deployment filesMonitoring container status with
docker-compose psand viewing logs withdocker-compose logsTask-2: Exploring Docker Volumes and Named Volumes 📂🔄
Utilizing Docker Volumes and Named Volumes for file and directory sharing
Creating multiple containers reading and writing to the same volume with
docker run --mountVerifying data consistency across containers with
docker execManaging volumes using
docker volume lsanddocker volume rm🧹📦
Till now you have learned how to create docker-compose.yml file and pushed it to the Repository. Let's move forward and dig more on other Docker-compose.yml concepts. Aaj thodi padhai krte hai on Docker Volume & Docker Network 😃
Introduction📖📖
🚀 Welcome, DevOps Engineers, to Day 19 of your Docker journey! Today, we'll delve into the essential aspects of Docker that specifically cater to the needs of DevOps professionals. Docker has become a staple in modern DevOps practices, offering containerization solutions that streamline development, deployment, and operations. Let's explore key concepts and practices tailored for DevOps in the Docker ecosystem. 🐳💻 #DevOps
⭐⭐Docker Volume: Creating Storage Areas for Containers 🗄️🐳⭐
Volumes in Docker are the preferred way to deploy a stateful set application in the form of containers. You can manage and persist Docker data outside of the container life cycle. Volumes, completely handled by Docker, offer advantages over bind mounts. Docker volumes enable seamless data sharing between containers and the Docker host. There are two types of volumes in Docker:
Named Volumes 📁
Bind Volumes 🔄
Display all the existing Docker Volumes
To display all the existing Docker Volumes, you can use the list command as follows.
docker volume ls
Inspecting Docker Volumes
To get the details of the Volumes you have created, you can use the Volume Inspect Command.
docker volume inspect file_name
Mounting Docker Volumes
After creating the Volume, the next step is to mount the Volume to Docker Containers. We will create a Docker Container with the Ubuntu base Image which you will mention in Dockerfile and mount the File_name Volume to that Container using the -v flag. You can install the Linux package by using the Dockerfile.
docker run -it -v file_name/shared-volume --name my-container-01 ubuntu
Create a file inside the Docker Volume
Inside the bash of the Container, create a new file and add some content.
ls
cd /shared-volume
echo “Hello Dosto Welcome to My Blog ” > file_name.txt
ls
exit
Create another Container and Mount the Volume
Create another Docker Container called my-container-02 geeks for geeks inside the Container.
docker run -it -v file_name:/shared-volume --name my-container-02 ubuntu
If you go to the shared-volume directory and list the files, you will find the file_name.txt file that you had created in the same volume but mounted in my-container-01 earlier, and it also has the same content inside it. 📂🔍 This is so because the volume is shared among the two Containers. 🔄🐳 Embrace the magic of Docker volumes for seamless data sharing! 🚀
⭐⭐Docker Network: Connecting Containers in Virtual Spaces⭐⭐
A network is a group of two or more devices that can communicate with each other either physically or virtually. The Docker network is a virtual network created by Docker to enable communication between Docker containers. 🌐🐳 If two containers are running on the same host, they can communicate with each other without the need for ports to be exposed to the host machine. 🚀🔗 You may use Docker to manage your Docker hosts in any platform manner, regardless of whether they run Windows, Linux, or a combination of the two. 🖥️🐧

Network Drivers
There are several default network drivers available in Docker and some can be installed with the help of plugins, Command to see the list of containers in Docker mentioned below.
docker network ls
Types of Network Drivers
bridge: If you build a container without specifying the kind of driver, the container will only be created in the bridge network, which is the default network.
host: Containers will not have any IP address they will be directly created in the system network which will remove isolation between the docker host and containers.
none: IP addresses won’t be assigned to containers. These containments are not accessible to us from the outside or from any other container.
overlay: overlay network will enable the connection between multiple Docker demons and make different Docker swarm services communicate with each other.
ipvlan: Users have complete control over both IPv4 and IPv6 addressing by using the IPvlan driver.
macvlan: macvlan driver makes it possible to assign MAC addresses to a container.

Creating a Network in Docker and Connecting a Container to That Network 🚀🔗
In Docker, create a network 🌐, connect containers to it, and watch the magic happen! Containers on the same network communicate seamlessly, and they can also talk to the host using IP addresses. 🚀🐳 One container can connect to multiple networks on the same Docker host. Explore the simplicity of Docker networking!
Step 1: In the first step we run a command to see the list of networks in your docker host.
docker network ls

A bridge is the default network in docker.
Step 2: If you want to see the information regarding the particular network you can use the inspect command.
docker network inspect docker_name
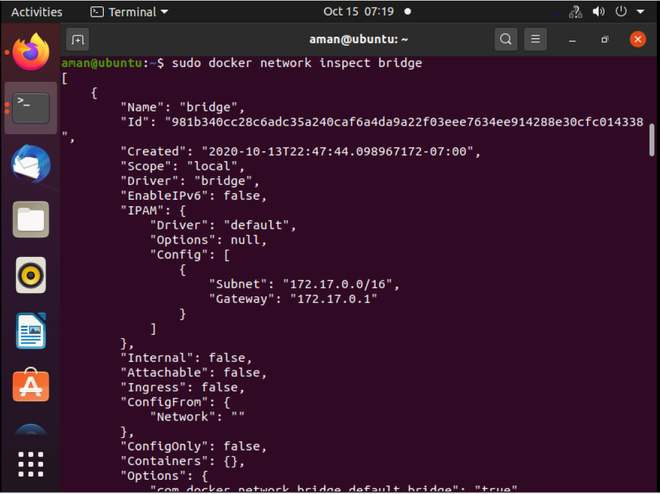
Notice that there is no container currently connected to the bridge driver as the brackets are empty.
Step 3: First we connect the container to the default bridge which is a driver provide default DNS service to the containers attached to it by running the command.
docker run -it ubuntu:latest /bin/bash

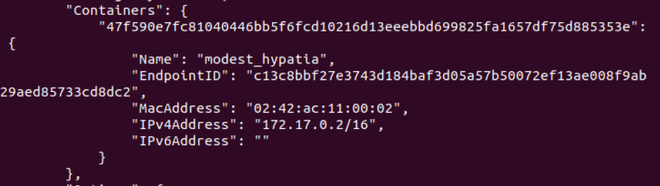
To exit from the Ubuntu container which we just created use Ctrl + p then Ctrl + q. Now again run the docker inspect command to see the attached containers to the bridge.
Step 4: Now in this step we are going to create our own network and then in the next step connect the container to that network.
docker network create --driver driver_name network_name
Description of the commands:
driver_name: name of the driver in this case we will use bridge driver.
network_name: name of the network you want to give to your network.

Now run🚀 the docker network ls command to see your created network.

Step 5: In this step, we will connect a container to our network which we have created in the previous step.
docker run -it --network=new_nw ubuntu:latest /bin/bash

Step 6: Now inspect the network we created. The container we attach to the respected network is mentioned there.
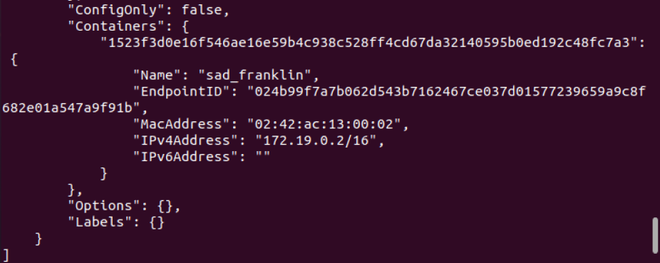
This is the complete process to create the network and connect the container to it.✔️
Conclusion🏁🔚
On Day 19, we conclude our exploration of Docker with a sense of accomplishment. Docker has been our companion, guiding us through the intricacies of containerization. From creating volumes for persistent storage to establishing networks for seamless communication, each concept has enriched our DevOps journey. As we bid farewell to Day 19, let Docker continue to be the catalyst for efficiency and scalability in your DevOps practices. Cheers to a successful Day 19 and to many more days of mastering the art of Docker! 🚀🐳 #Day19 #Docker


