Day 23 Task: Jenkins Freestyle Project for DevOps Engineers.
**
Index 📚✨**
1. Introduction 🚀
- DevOps Essentials: CI/CD, Build Jobs, and Jenkins Freestyle Projects 🔄💻
2. Understanding CI/CD 🌐
Overview of Continuous Integration (CI) 🔄
Extending to Continuous Deployment (CD) 🚚
Significance in Modern Software Development 🌐🔧
3. Unpacking the Build Job 🏗️
Role in CI/CD Pipelines 🔄👷
Docker Context: "docker build" for Image Creation 🐳🖼️
4. Exploring Jenkins Freestyle Projects 🛠️🤖
User-Friendly Automation with Jenkins 🌐🧑💻
Configuring Build Steps and Project Settings ⚙️📝
5. Today's Tasks - Docker Automation with Jenkins 🎯
Task-01: Dockerize Your App 🐳
Setting up a Jenkins Agent 🛠️👨💻
Configuring a Jenkins Freestyle Project 🔄🏗️
Build Steps: "docker build" and "docker run" 🏗️🏃
Task-02: Docker Compose in Jenkins 🔄🐳
Creating a Jenkins Project for "docker-compose up -d" 🌐🏗️
Cleanup Step: "docker-compose down" 🔄🧹
6. Conclusion 🎉🤓
Recap of Key Learnings 🔄🧠
Next Steps in Your DevOps Journey 🚀👣
**Introduction 🚀**
Today, we're diving into the dynamic duo of Jenkins Freestyle Projects and Docker. 🐳 Unpack the power of Continuous Integration/Continuous Deployment (CI/CD) and the essence of Build Jobs. Jenkins Freestyle Projects offer a user-friendly gateway to automation. 🛠️✨
Tasks:
👨💻 Task-01: Dockerize Your App
Set up a tailored Jenkins agent.
Configure a Freestyle Project.
Add build steps for "docker build" and "docker run" commands.
🔄 Task-02: Docker Compose in Jenkins
Create a Jenkins project for "docker-compose up -d."
Implement a cleanup step for "docker-compose down."
** Understanding CI/CD 🌐**
Continuous Integration (CI) and Continuous Deployment (CD) 🔄:
Automates integration of code changes from multiple developers into a single codebase.
Developers commit their work regularly to a central code repository (e.g., GitHub, Stash).
Automated tools handle tasks like building new code, conducting code reviews, and more upon integration.
Key Goals of Continuous Integration 🚀:
Swiftly find and address bugs.
Facilitate easy code integration across a team of developers.
Improve software quality.
Reduce the time required to release new feature updates.
Popular CI Tools 🛠️:
- Jenkins, TeamCity, Bamboo.
Challenges Addressed by Continuous Integration 🛡️:
Difficulty in merging code due to prolonged isolation of developers.
Prone to conflicts and time-consuming merging process.
Accumulation of bugs identified only in later development stages.
Hindrance in delivering updates quickly to customers.
Continuous Integration Workflow 🔄:
Developers commit to a shared repository using version control systems like Git.
Continuous integration pipeline automates:
Builds.
Storage of artifacts.
Execution of unit tests.
Code reviews using tools like Sonar.
The CI pipeline is triggered with each commit/merge in the codebase for efficient development.
Continuous Delivery 🚚
Production Testing Playground 🌐:
Play with code in a safe environment like the real deal.
No last-minute surprises, catch bugs early.
Thorough Testing 🧪:
Test everything - buttons, speed, teamwork.
Find and fix problems before they hit users.
Smooth Updates, Less Hassle 🔄:
Release with confidence, fewer risks, and costs.
Keeps software quality high and devs happy.
Ready-to-Go Code 🚀:
Code ready for deployment, like a packed suitcase.
Happens after Continuous Integration magic.
Tools You Might Know 🛠️:
- AWS CodeDeploy, Jenkins, GitLab.
Continuous Deployment 🚀
Final Stage Power-Up 🔄:
Takes Continuous Delivery up a notch to full deployment.
No manual brakes, high automation mode.
Quick & Automatic Deployment 🏭:
Changes go live almost instantly.
No waiting around; automation takes charge.
Cloud Journey for Apps ☁️:
Code changes travel through the cloud.
Developer-driven, live in minutes with automated tests.
Push Button, Not Traffic Light 🤖:
Fully automated release process.
Deploy to live production whenever needed.
Familiar Tools Still Here 🚀:
- AWS CodeDeploy, Jenkins, GitLab.
CI and CD Workflow
The below image describes how Continuous Integration combined with Continuous Delivery helps quicken the software delivery process with lower risks and improved quality.
CI / CD workflow
We have seen how Continuous Integration automates the process of building, testing, and packaging the source code as soon as it is committed to the code repository by the developers. Once the CI step is completed, the code is deployed to the staging environment where it undergoes further automated testing (like Acceptance testing, Regression testing, etc.). Finally, it is deployed to the production environment for the final release of the product.
If the deployment to production is a manual step. In that case, the process is called Continuous Delivery whereas if the deployment to the production environment is automated, it is referred to as Continuous Deployment.
Why is CI/CD Important?
CI/ CD enables organizations to develop software quickly and efficiently. CI/CD enables an effective process for getting products and software to market faster than ever before, continuously moving code into production, and ensuring a steady flow of new features
*Unpacking the Build Job 🏗️**
A Jenkins build job contains the configuration for automating a specific task or step in the application building process. These tasks include gathering dependencies, compiling, archiving, or transforming code, and testing and deploying code in different environments.
Jenkins supports several types of build jobs, such as freestyle projects, pipelines, multi-configuration projects, folders, multibranch pipelines, and organization folders.
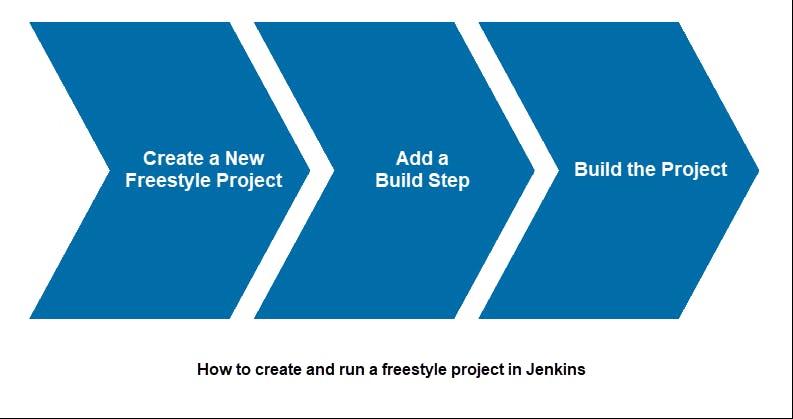
How to Set up a Build Job in Jenkins
Follow the steps outlined below to set up and run a new Jenkins freestyle project.
Step 1: Create a New Freestyle Project
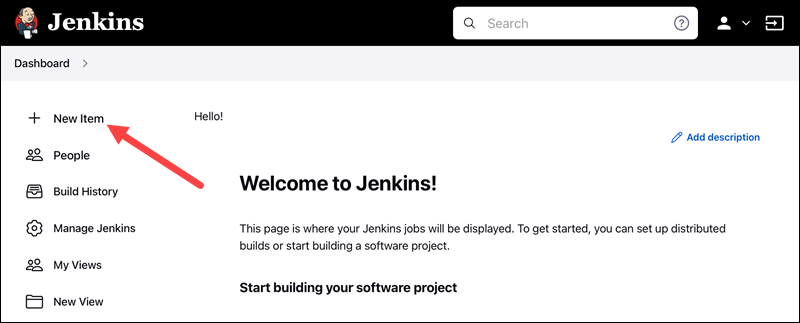
1. Click the New Item link on the left-hand side of the Jenkins dashboard.
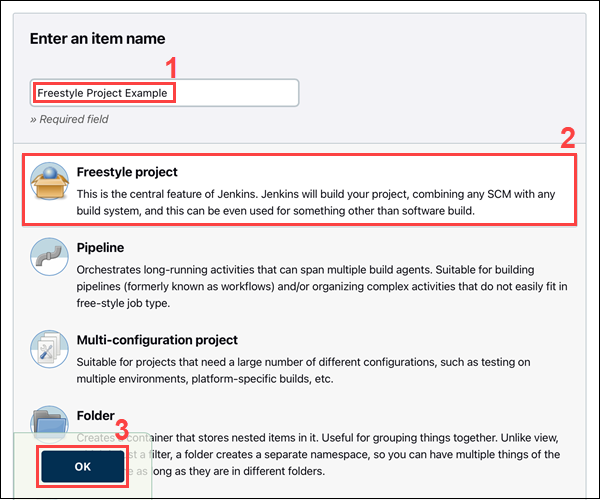
2. Enter the new project's name in the Enter an item name field and select the Freestyle project type. Click OK to continue.
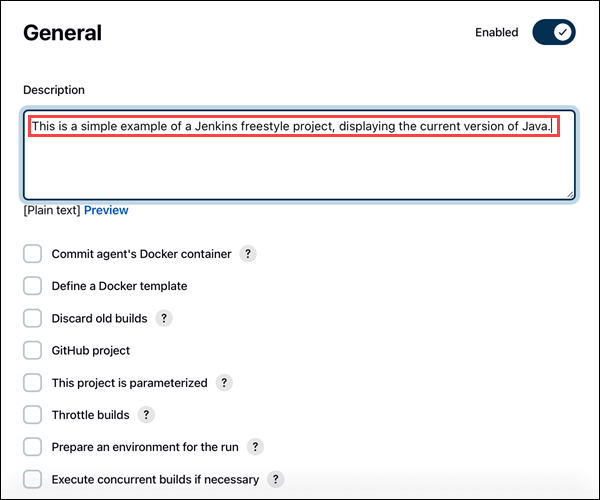
3. Under the General tab, add a project description in the Description field.
Step 2: Add a Build Step
1. Scroll down to the Build section.
2. Open the Add build step drop-down menu and select Execute shell.
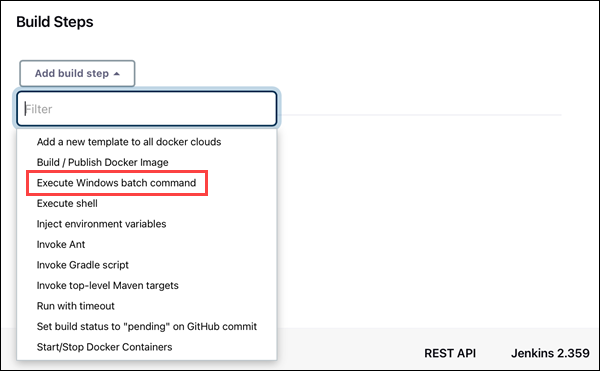
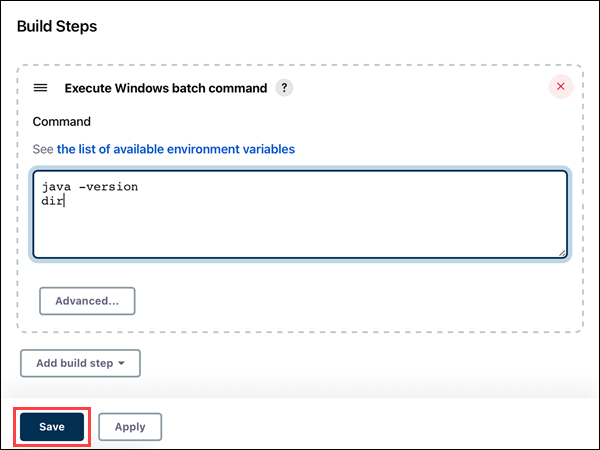
3. Enter the commands you want to execute in the Command field. For this tutorial, we are using a simple set of commands that display the current version of Java and Jenkins working directory:
java -version
dir
4. Click the Save button to save changes to the project.
Note: Need a cheap sandboxing environment with automated OS-deployment options? See how easy it is to deploy a development sandbox for as little as $0.10/hour.
Step 3: Build the Project
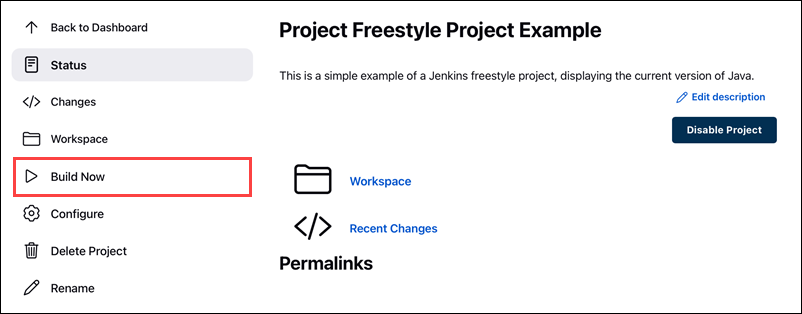
1. Click the Build Now link on the left-hand side of the new project page.
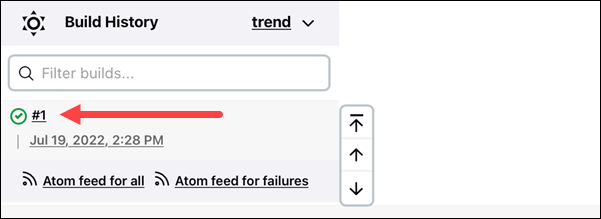
2. Click the link to the latest project build in the Build History section.
3. Click the Console Output link on the left-hand side to display the output for the commands you entered.

4. The console output indicates that Jenkins is successfully executing the commands, displaying the current version of Java and Jenkins working directory.
Today's Tasks - Docker Automation with Jenkins 🎯
Task-01: Dockerize Your App 🐳
Certainly! A hands-on section can guide the reader through the actual steps of implementing Task-01 using Jenkins. Here's an example:
Hands-On: Configuring Jenkins for Automated Docker Builds and Deployment 🤲💻
Step 1: Set Up a Jenkins Agent
Open your Jenkins dashboard and navigate to "Manage Jenkins."
Click on "Manage Nodes and Clouds."
Create a new Node (agent) tailored to your Dockerized app's needs.
Ensure Docker is installed on this agent. This agent will help Jenkins understand and execute Docker commands.
Step 2: Create a Freestyle Project
Go back to the Jenkins dashboard.
Click on "New Item" to create a new project.
Choose "Freestyle project" and give it a meaningful name.
In the project configuration, link it to your version control system if needed.
Step 3: Configure the Build Section
In your project, find the "Configure" option.
Scroll down to the "Build" section.
Click on "Add build step" and choose "Execute shell" (for Linux/Mac) or "Execute Windows batch command" (for Windows).
Step 4: Add "docker build" Build Step
In the command box, type the following to build your Docker image:
docker build -t your-image-name:tag -f path/to/Dockerfile .Replace
your-image-name:tagwith your desired image name and tag. Replacepath/to/Dockerfilewith the actual path to your Dockerfile.
Step 5: Add "docker run" Build Step
Add another build step.
In the command box, type the following to run your Docker container:
docker run -p 8080:80 your-image-name:tagReplace
your-image-name:tagwith the image name and tag you used in the previous step.
Step 6: Save and Build
Save your project configuration.
Trigger a manual build to see Jenkins in action.
Check the console output for any issues or successful execution.
Congratulations! You've just configured Jenkins to automate the build and run steps for your Dockerized app. 🎉💻
Certainly! Let's break down the hands-on steps for your Jenkins project to run Docker Compose commands:
Hands-On: Jenkins and Docker Compose Automation 🤖🐳
Task-02: Docker Compose Automation
Prepare Your Jenkins:
Ensure Jenkins is up and running.
Verify that the necessary plugins (Docker and Docker Compose) are installed.
Create a New Jenkins Project:
In Jenkins, create a new project specifically for running Docker Compose commands.
Choose the "Freestyle Project" option.
Configure the Project:
Name your project something descriptive, like "Docker Compose Automation."
Set up the version control settings if applicable.
Build Section Configuration:
In the project configuration, head to the "Build" section.
Add a build step to run the "docker-compose up -d" command.
Specify the path to your Docker Compose file (Hint: Use the one from Day-19).
Cleanup Step Configuration:
Add another build step for cleanup.
Run the "docker-compose down" command to stop and remove containers.
Save and Trigger Automation:
Save your project configuration.
Manually trigger the project or set up automatic triggers based on your preferences.
Observe Jenkins in Action:
- Watch as Jenkins fetches your Docker Compose file, starts the containers, and performs cleanup when needed.
Check Console Output:
After running the project, check the console output in Jenkins.
Ensure that Docker Compose commands are executed successfully.
By following these hands-on steps, you're automating the deployment and cleanup of multiple containers using Docker Compose through Jenkins.
Conclusion
In today's #90daysofdevops challenge, DevOps engineers mastered Jenkins Freestyle Projects, showcasing expertise in Continuous Integration (CI), Continuous Delivery (CD), and Jenkins build jobs. They harnessed the versatility of Jenkins build jobs as automation blueprints and flexed their skills in crafting Freestyle Projects. Practical tasks, including Dockerized app orchestration and Docker Compose for multi-container deployments, demonstrated Jenkins' real-world application. This achievement propels the community towards greater DevOps excellence, combining innovation, automation, and transformation in a dynamic and collaborative landscape. 🔧💻🌐
